 Password Recovery
 How to use hashcat software to explode various hashes
Zero, Background Knowledge
1. hash Function
hash function is a general term for a type of function. The input of this type of function is arbitrary binary data, and the output is binary data of a fixed length. This type of function has the following characteristics:
Unidirectionality: It is simple and fast to calculate the output from the input, while it is mathematically impossible to deduce the input from the output.
Collision constraint: It is extremely difficult to find two different inputs with the same output.
Functions that meet these characteristics can all be called hash functions. Taking a certain data as input to a hash function, the output is calculated, which is conventionally referred to as the hash value of the data.
One of the main functions of the hash function is to securely store the password. It does not store the password directly (that is, it does not store the plaintext password), but rather stores the hash value of the password. During verification, you only need to calculate the hash value of the entered password again and compare it with the hash value of the saved password to know whether the password is correct. Due to the one-way nature of hash functions and the collision constraints, even if an attacker obtains the hash value of a password, it is difficult to know the password itself.
2. hashcat
If an attacker obtains the hash value of the password, is there really no way to know the password itself? Of course not. Although it is mathematically impossible to calculate a password directly from its hash value, we know that the hash function is simple and quick to calculate the output from the input. At worst, we can try it. Humans can only set those passwords. We can try them one by one. If we are lucky, we can still figure them out. The operation of constantly trying to obtain the input corresponding to the hash value is called bursting.
Based on this idea, hashcat was born. It is said that hashcat was created to prove that cracking hashes is a very simple thing. hashcat claims to be the world's fastest hash-blasting tool, and it even supports GPUs and FGPAs, if you have them.
hashcat is not only fast, but also professionally supports more than two hundred hash functions. Using the command:
hashcat --help
you can see a list of all the hash functions supported by hashcat. There are too many, so I won't post them here.
hashcat is installed by default in Kali and can be used directly. But I have Kali installed in VirtualBox and always feel that virtual opportunities are slower, so I want to use hashcat in a physical host. First, download hashcat from the official website. As of now, the latest version is v3.5.0, released on April 5, 2017. The update date shows that hashcat is very dynamic. Save yourself the trouble of compiling and download the binary package directly. It's only 2.7MB, which is very small compared to games that often take tens of gigabytes.
After downloading, unzip hashcat. You will see:
. These files are executable files in 32-bit and 64-bit linux and windows, respectively. Choose one of them according to your computer's situation. I chose hashcat64.bin. For aesthetic reasons, I added a line to the ~/.bashrc file:
alias hashcat='The path of hashcat64.bin '
. After saving, I reopened the virtual terminal to make the ~/.bashrc file take effect. This way, no matter where you are, you can directly enter the hashcat command without switching directories or entering the unsightly "64.bin", as shown in the image below.

Okay, now you can start using hashcat to crack various hashes.
I. Blast md5
md5 is probably one of the most famous and widely used hash functions. First, use Python to generate several md5 values for explosion. The code is as follows:
  import hashlib
  passwords = ['123123', 'bond007', 'xxxxxx', '*H@&(NT*@BR#^']
  for password in passwords:
    md5 = hashlib.md5()
    md5.update(password)
    print md5.hexdigest()
The above code calculates the hash values of the four strings respectively, and the output result is:
  4297f44b13955235245b2497399d7a93
  cbdb7e2b1ed566ceb796af2df07205a3
  dad3a37aa9d50688b5157698acfd7aee
  d77db958c179bbffae04b2b908b75c26
Save the output results in the file md5.hash, one hahs value per line. Then use hashcat to explode these hash values, using the following command:
hashcat -w 3 -a 0 -m 0 --remove -o md5.out md5.hash wordlist.dic
The -w parameter is used to specify four operating modes, as shown in the following table:
| N | Performance | Runtime | Power Consumption | Desktop Impact |
|---|---|---|---|---|
| 1 | Low | 2 ms | Low | Minimal |
| 2 | Default | 12 ms | Economic | Noticeable |
| 3 | High | 96 ms | High | Unresponsive |
| 4 | Nightmare | 480 ms | Insane | Headless |
The -a parameter is used to specify the attack mode. 0 means direct and continuous, that is, using a password dictionary to explode. -a has five values, as shown in the table below:
| N | Mode |
|---|---|
| 0 | Straight |
| 1 | Combination |
| 3 | Brute-force |
| 6 | Hybrid Wordlist + Mask |
| 7 | Hybrid Mask + Wordlist |
-m Used to specify the hash to blow The hash function for the value, with 0 indicating that the hash function is md5. Other values are shown in the table below:
| N | Name | Category |
|---|---|---|
| 0 | MD5 | Raw Hash |
| 300 | MySQL4.1/MySQL5 | Database Server |
| 1000 | NTLM | Operating Systems |
| 1800 | sha512crypt $6, SHA512 (Unix) | Operating Systems |
| 2611 | vBulletin < v3.8.5 | Forums, CMS, E-Commerce, Frameworks |
This table is too long. I will only show a few hash functions involved in this article here. You can see them all with the parameter –help.
The parameter –remove means that if a hash value is successfully exploded, it will be removed from md5.hash.
The parameter -o is followed by a filename indicating where to save the explosion results.
The last two parameters, md5.hash and wordlist.dic, are the hash value and password dictionary to be cracked, respectively. The hash value and password dictionary are both one line at a time. The contents of md5.hash are already calculated by Python. If you don't have a suitable password dictionary, you can use the command:
wget -O wordlist.dic https://samsclass.info/123/proj10/500_passwords.txt
下载一个。现在完事具备,按下回车,结果华丽地报错:(
clGetPlatformIDs(): CL_PLATFORM_NOT_FOUND_KHR

It's probably missing some kind of runtime environment, so install it. I have this stuff installed in total:
  sudo apt-get install gcc make p7zip-full git lsb-core
  wget http://registrationcenter-download.intel.com/akdlm/irc_nas/9019/opencl_runtime_16.1.1_x64_ubuntu_6.4.0.25.tgz
  tar -xvf opencl_runtime_16.1.1_x64_ubuntu_6.4.0.25.tgz
  cd opencl_runtime_16.1.1_x64_ubuntu_6.4.0.25
  sudo ./install.sh
If the network speed is good, it will install in a short while. The first command gives an error:
  /sbin/ldconfig.real: /usr/lib/nvidia-375/libEGL.so.1 is not a symbolic link
  /sbin/ldconfig.real: /usr/lib32/nvidia-375/libEGL.so.1 is not a symbolic link
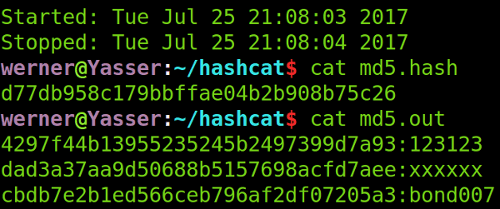
But it doesn't seem to affect anything, so just ignore it. After installing these, I pressed Enter again to run the command that had originally given the error. Sure enough, no error was given again, and the execution was completed in the blink of an eye. After the command is executed, check the contents of files md5.hash and md5.out. It is found that only one hash remains in md5.hash. The three successfully cracked hashes have been transferred to file md5.out. md5.out contains the three hash values and their original values, as shown in the image below:
II. Cracking the Windows 7 login password hash
The hash value of the Windows login password is stored in the SAM file. SAM is the acronym for "security account manager". Typically, it is located at
C:\Windows\system32\config\SAM
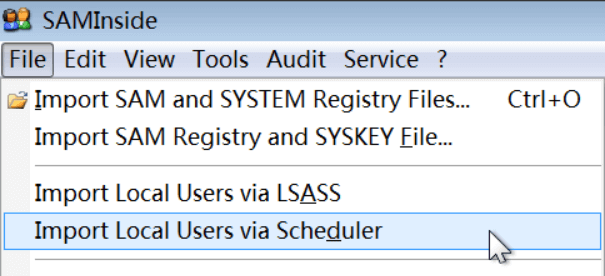
SAM files are protected by Windows and cannot be read directly; they require tools such as SAMInside. Find a Windows 7 virtual machine, create a new administrator user named hashcat, set a password, download and extract SAMInside in Windows 7, and run it with administrator privileges. Then click File->Import Local Users vis Scheduler, as shown in the image below:
After that, SAMInside may "not respond," but don't worry, wait patiently for a few seconds, and SAMInside will read the hash we want, as shown in the image below:

Select the user "hashcat" whose password we want to crack, press Ctrl+5 to copy the NT-hash, and then return to Ubuntu with hashcat installed. Use the following command to save the copied hash value to the File win7.hash:
echo 356CEAE0C89FB65ED6D6AA7A445C4CE5 >{ hashcat -w 3 -a 0 -m 1000 --remove -o win7.out win7.hash wordlist.dic
The execution is complete after a moment. Checking the win7.out file, it is found that the explosion was successful. The login password for user hashcat is rush2112:
werner@Yasser:~/hashcat$ cat win7.out
356ceae0c89fb65ed6d6aa7a445c4ce5:rush2112
For information on how to obtain the SAM file, please refer to "How to Export Windows Hash Series 1". The following is a record of my process of reading SAM files in a virtual machine, Windows 7.
If it is a physical machine, start the machine with Win PE and read the SAM file on the disk. Mine is a virtual machine. By mounting the virtual disk files to the file system, I can read the files in the virtual disk. The virtual machine I'm using is VirtualBox, and this can be accomplished using the command vdfuse. If you don't have vdfuse, you need to install virtualbox-fuse first:
sudo apt-get install virtualbox-fuse
You can also download the virtualbox-fuse installation package and install it yourself.
After the installation is complete, the vdfuse command will be available to start virtual disk mapping and mounting:
mkdir -p ~/vmdisk
sudo vdfuse -t vmdk -f Win7Pro32.vmdk ~/vmdisk/
After completing this step, check the ~/vmdisk directory, which contains three files: EntireDisk, Partition1, and Partition2. Create a new directory:
mkdir -p ~/vmdisk_en
mkdir -p ~/vmdisk_1
mkdir -p ~/vmdisk_2
Use the mount command to mount the three files EntireDisk, Partition1, and Partition2 respectively:
sudo mount ~/vmdisk/EntireDisk ~/vmdisk_en
sudo mount ~/vmdisk/Partition1 ~/vmdisk_1
sudo mount ~/vmdisk/Partition2 ~/vmdisk_2
found that the EntireDisk mount failed, the content in Partition1 was not what I wanted, and Partition2 contained files from a Windows 7 virtual machine, which was exactly what I wanted. Copy our target SAM file from vmdisk_fs:
cp ~/vmdisk_2/Windows/System32/config/SAM ./
Also copy the SYSTEM file:
cp ~/vmdisk_2/Windows/System32/config/SYSTEM ./
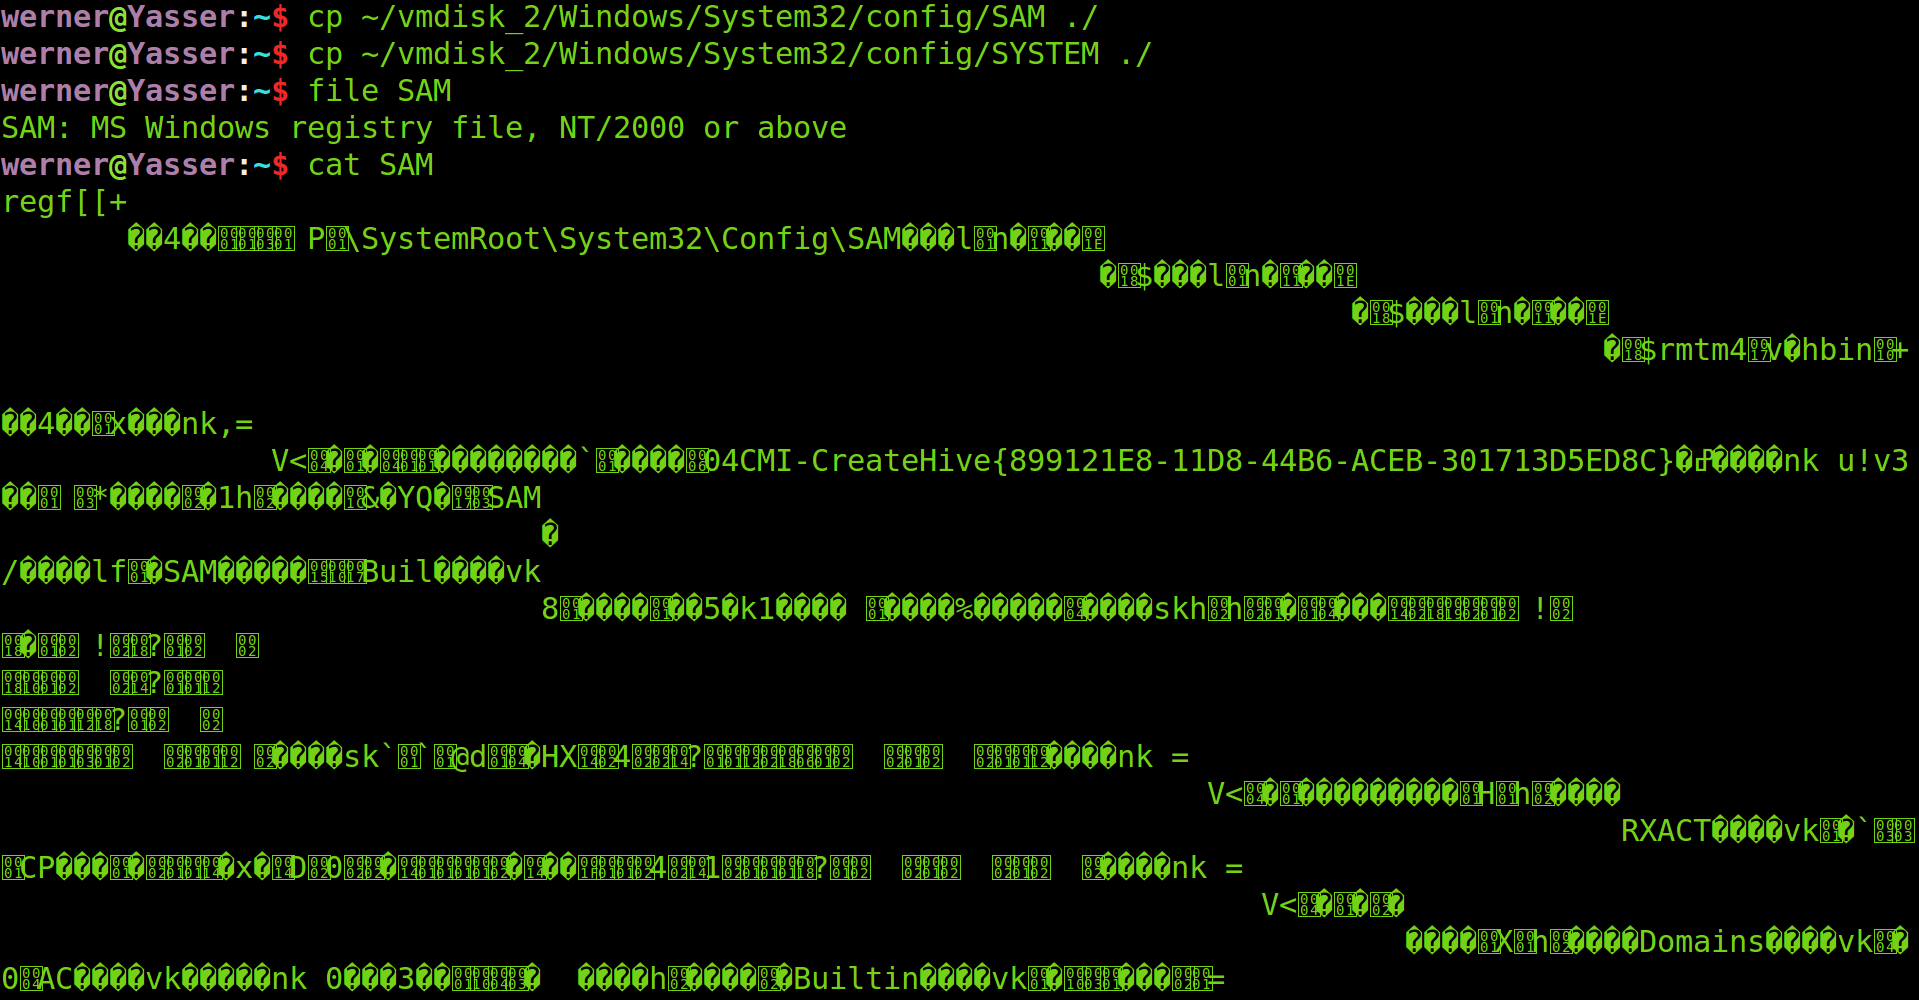
Check the contents of the SAM file, as shown in the image below. It's not a plain text file, which is definitely Windows style.
Okay, although we successfully opened the SAM file, we still didn't get the hash. What should we do next? You can only use tools to parse the contents of the SAM file. Get both the sam file and the SYSTEM file into Kali, run the command:
samdump2 -o sam.hash SYSTEM sam
Then check the sam.hash, and you can also see the hash value of each user's login password. Each line in the sam.hash file represents a user, and the format of each line is:
User name: RID: LM-hash value: NTLM-hash value
Note that this format is the samdump2 command output format, not the "hash password format under Windows".
III. Cracking the linux login password hash
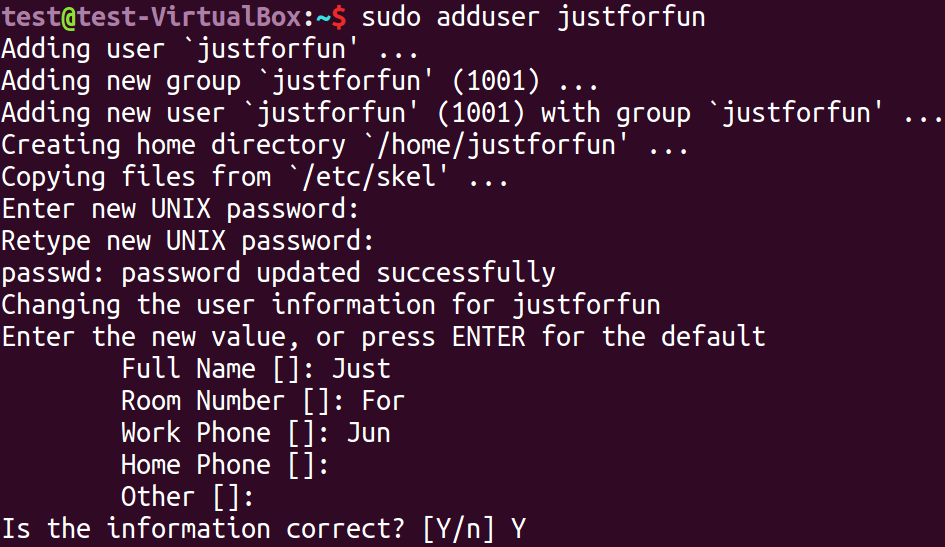
First, you need a computer running the linux system. That's easy; a virtual machine will suffice. Then, run the following command to add a new user and set a password for our explosion:
sudo adduser justforfun
In linux, the hash value of the user's login password is stored in the file /etc/shadow (note: not /etc/passwd). Use the following command to view the hash value of the new user's login password:
test@test-VirtualBox: ~$ sudo tail -n 1 /etc/shadow
justforfun:$6$0fokwg59$6hpMS5dM9wDT/42DDoSD0i0g/wHab50Xs9iEvVLC3V20yf1kRmXZHGXCM0Efv6XU69hdgMZ4FwaMzso4hQaGQ0:17373:0:99999:7:::

The tail command is used to read the last few lines of a file. The default is 10 lines, and the number of lines is specified with the parameter -n. The user we just created is naturally on the last line, so we use tail -n 1 to read it. The result is data separated by ":". The first part is the username "justforfun", and the second part is the password hash value. The other parts are not necessary for this article. We will focus on the second part.
The "$6$" at the beginning of indicates that the type of hash function used is SHA-512. In addition to "$6$", in linux, "$1$" refers to MD5, "$2a$" refers to Blowfish, "$2y$" refers to Blowfish (correct handling of 8-bit chars), and "$5$" Refers to SHA-256, see Wikipedia: passwd for details. In addition, the file /etc/login.defs also explains the hash algorithm.
The part "0fokwg59" from the beginning of "$6$" to the next "$" is SALT. What is salt? Baidu Knows CNB2009's answer to the question "What is md5 salt value " is simple and easy to understand:
Simply put, it is a method to make the same password have different hash values, which is salting. MD5 itself is irreversible, but there are many databases on the Internet that support reverse queries. If the user password database is accidentally leaked, hackers can obtain the user password through reverse queries or brute-force the hash code that appears frequently in the database (i.e., it is used by many people) (because it is usually a weak password). The salt value is an additional random value added during the password hashing process. For example, if my id is "epilepsy ω inverted ④ゞ" and my password is 123456, the string "123456/epilepsy ω inverted ④ゞ" can be hashed when it is stored in the database. When verifying the password, the string "(password to be verified)/epilepsy ω inverted ④ゞ" can also be used for verification. This way, even if there is another idiot with the password 123456, different hash values can still be constructed and verified successfully. At this point, my id will be used as a salt value for a complex hash of the password. So... The role of salt values is to reduce the losses caused by database leaks. If you're very lucky and guess my password is 123456, I can't stop you.
This answer is for md5, and the same applies to other hash functions. The part after the salt is the hash value. Now copy the entire second part to the file linux.hash, the contents of linux.hash should be:
$6$0fokwg59$6hpMS5dM9wDT/42DDoSD0i0g/wHab50Xs9iEvVLC3V20yf1kRmXZHGXCM0Efv6XU69hdgMZ4FwaMzso4hQaGQ0
Then crack the linux login password hash with the following command:
hashcat -w 3 -a 0 -m 1800 --remove -o linux.out linux.hash wordlist.dic
Moments later, the burst is complete, check the results:
werner@Yasser: ~/hashcat$ cat linux.out
$6 $0fokwg59 $6hpMS5dM9wDT/42DDoSD0i0g/wHab50Xs9iEvVLC3V20yf1kRmXZHGXCM0Efv6XU69hdgMZ4FwaMzso4hQaGQ0:4321
It can be seen that the blast succeeded.
IV. Cracking the Mysql login password hash
First, you need Mysql. I happen to have it in my virtual machine. Baidu knows that the hash value of Mysql login passwords is stored in the file user.MYD. Where is the file user.MYD? I don't know either, I'll just look for it:
test@test-VirtualBox:~$ sudo find / -name user.MYD
/var/lib/mysql/mysql/user.MYD
was found in /var/lib/mysql/mysql/user.MYD. View the file contents:
sudo cat /var/lib/mysql/mysql/user.MYD
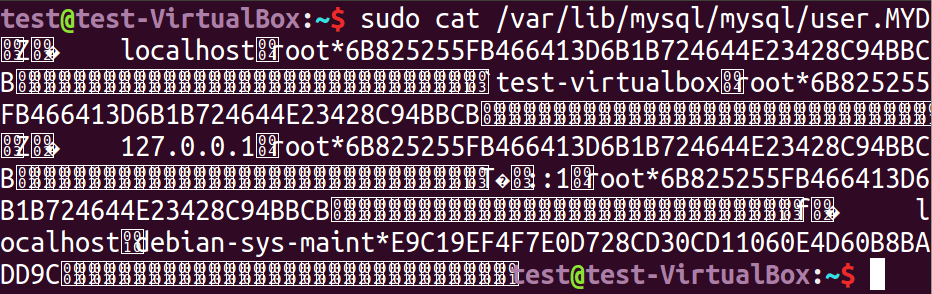
It's not a plain text file, so it doesn't matter much. You can still see that the hash value of the user root's login password is:
6B825255FB466413D6B1B724644E23428C94BBCB
Save this value to the file mysql.hash and use the following command to crack the mysql login password hash:
hashcat -w{ } After a moment, the burst is complete. View the results:
werner@Yasser: ~/hashcat$ cat mysql.out
6b825255fb466413d6b1b724644e23428c94bbcb:viper
It can be seen that the blasting succeeded.
V. Blast Discuz! Forum Password
Discuz! It is a well-known php forum program in my country and is widely used. Now let's explode Discuz! The hash value of the user's password. First, we need to find the hash value. Where do we find it? From Discuz, of course! In the database.
Discuz available! Where is the database? Here's how I solved it: download the latest version of Discuz from its official website! Source code, run and install, and you get Discuz! Database of 
Discuz! The default database name is ultrax, and the pre_ucenter_members table stores the hash value of the login password. "pre_" is the default prefix and can be changed during installation, while "ucenter_members" will not change. Use the following sql statement to query the hash value of the login password:
select password, salt from pre_ucenter_members;
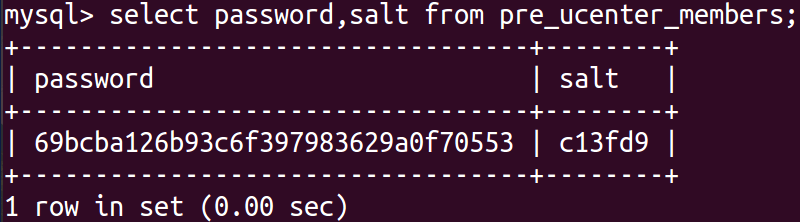
Save the hash and salt values to a file:
echo 69bcba126b93c6f397983629a0f70553:c13fd9 > discuz.hash
The hash and salt values are on the same line, separated by ":". Finally, burst the Discuz login password hash with the following command:
hashcat -w 3 -a 0 -m 2611 --remove -o discuz.out discuz.hash wordlist.dic
A moment later, the blast is complete. View the results:
werner@Yasser: ~/hashcat$ cat discuz.out
69bcba126b93c6f397983629a0f70553:c13fd9:winter
It can be seen that the blasting was successful.
VI. Large Dictionary Test
To date, we have successfully cracked various hashes using a small dictionary of only 500 words in just a moment each time. Isn't that strange? This is because I deliberately set a weak password in the dictionary to practice using hashcat; otherwise, it would be very frustrating if I couldn't reveal it. In reality, such good luck is impossible. Let's randomly calculate the md5 value of a not-so-weak password and use a large dictionary to crack it. On the one hand, let's try our luck, and on the other hand, let's see how fast hashcat can be.
Calculate the md5 value first:
import hashlib
md5 = hashlib.md5()
md5.update("werner123456!!!")
print md5.hexdigest()The output is:
b17133f9abff287ed0546c1af2b171f7
Then select a 10.5G dictionary containing 940 million passwords and start exploding:
hashcat -w 3 -a 0 -m 0 --remove -o big.out b17133f9abff287ed0546c1af2b171f7 big.dic
Note that when there is only one hash value, you do not need to save it in a file; you can write it directly in the command line parameters. I Started blasting before bed, and when I woke up the next day to check the results, I found:
Started: Wed Jul 26 22:55:27 2017
Stopped: Wed Jul 26 23:02:28 2017
It only took 7 minutes! I thought it would take 7 hours, but it's 60 times faster than I expected! Unfortunately, the hash value was not successfully cracked, indicating that "werner123456!!!" is not in the password dictionary. It seems I need to prepare a 100GB password dictionary, but saving and transferring such a large dictionary is very inconvenient. Is there no other way? Of course there is. Remember the attack mode? We've been using the "Straight" mode, so let's explore a few other modes.
VII. Summary
When using hashcat to crack a hash, the first step is to find the hash accurately. Different systems and software have different locations for the hash, so it is necessary to accurately find the hash value. Secondly, it is necessary to correctly determine the hash type, determine whether hashcat supports this type of hash, and select the correct -m parameter; otherwise, it is almost impossible to succeed. Thirdly, the password dictionary must be good; whether it can be successfully cracked ultimately depends on the dictionary. While a larger password dictionary isn't necessarily better, a larger one is always better. hashcat is also known for its speed, so a large dictionary isn't a problem for hashcat. Here's a good dictionary: Past leaks + a collection of commonly used weak password dictionaries.7Z, with the decompression password: anywlan. Additionally, if you have collected many small dictionaries, you can merge, sort, and deduplicate them to create a large dictionary, which can be used for hashcat exploitation. If the small dictionaries are in the same directory, you can use a single command:
cat * | sort | uniq > Merge.dic
What if the small dictionaries are organized by category and distributed in multiple directories? Using only the cat command is obviously not sufficient, but actually only one command is needed. Assuming that all the small dictionaries are stored in the directory MyDictionary, the command can be written like this:
find ./MyDictionary -type f -exec cat {} \; | sort | uniq > Merge.dic